Wave Generator

HTML

CSS

JavaScript

AI

SVG

Open Source

Projects

Last Updated: 2024-12-29

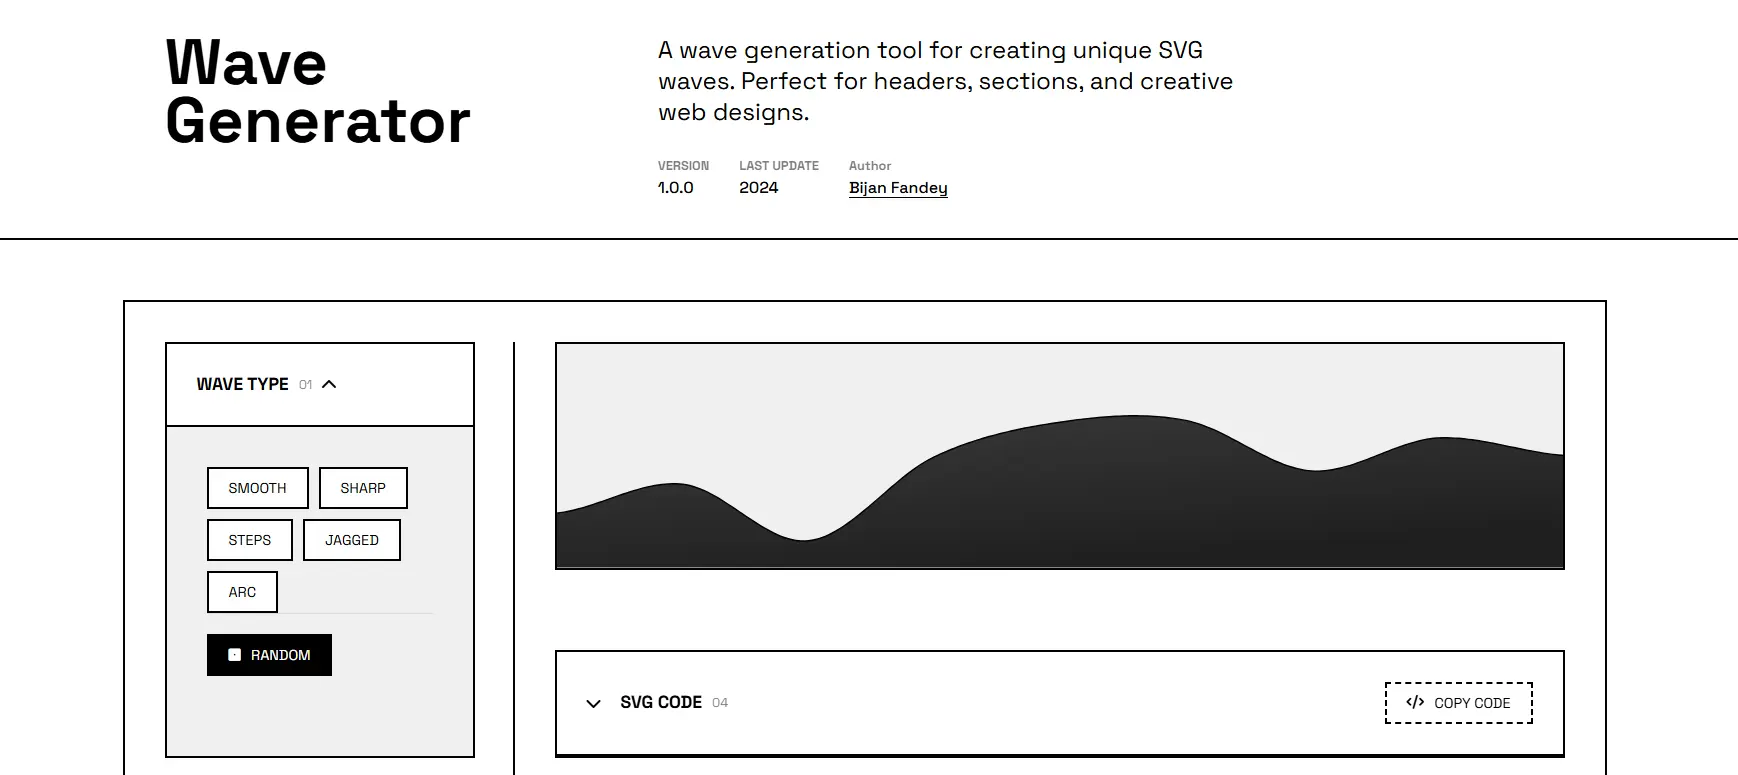
TLDR: I Built an SVG wave generator to help developers build better websites.


Summary
I talk about the process I took in building my own custom svg wave generator, how I used AI to help jump start the project, but dug in very deep to the underlying concepts of what makes an svg path work in html. I go through some of the differences between Bézier curve types and some of the code that I used as I walk you through my work and learning process.


Check Out Wave Generator

Wave Generator Github


A Long and Winding Path Intro

Hi, I’m Bijan!

I am in the process of building a content management system, and part of that is building a super incredible and convoluted theme editor that makes it really fun, and most importantly super simple, to make a stunning website.

It’s a long and tricky task, but I really wanted to add unique features to the theme builder so users can feel like it’s truly something new and unique.

I assumed a tool like this existed already, so I went searching on the internet and I found haikei.app. At the time of coding the app was down, however the app did come back online as I was writing this. While it was down, I did a bit more digging and that’s when I came across the parent of haikei, and found a free tool called Getwaves.io.

This was a great start for inspiration, however it wasn’t exactly what I was looking for, I needed more features and I also need it to integrate directly into my editor, so using haikei wouldn’t allow me to support my user-base in the way I need it to.

Famous Last Words

“Hmmm… I can do that.” - Bijan Fandey, 2024

It didn’t seem like that difficult of a task to create my own, if you don’t think about it too hard it’s just putting points on a line and moving those points. SIMPLE!

Realistically the only part of this project I didn’t know how to do was creating and editing an SVG path with code, thankfully AI will help me craft the most optimal solution, right!?

Spoiler alert, the AI outcome was… fine… and lackluster. It of course required a few hours of back and forth, but the final product is usable, and good, and better than what I could have done alone in the same amount of time. I spent another day or two fine tuning some functionality and cleaning up the design for user experience.

The only issue now was I didn’t really understand the code, and I HATE using code I don’t understand.

and now a rant about AI…

Sometimes I ask people to tell me what their AI code does and they simply don’t know. I find that infuriating. It’s like writing a story and not being able to tell anyone who the main character is.

IF YOU DON’T UNDERSTAND CODE, THEN DON’T USE IT!

You are harming yourself and others by doing this. The tech-debt alone will kill you as you continue on a project. Overall, if you can’t type it, please don’t just copy and paste it.

AI is another tool in your toolbox. Just like a hammer or a wrench.

Can you use a hammer to build an entire house? Sure!

Will the house work as a shelter… probably.

Would it have been better if you learned how to use more tools, like a drill? Yes.

This is the point I am trying to make when it comes to working with AI. It is there to help you, but think of it as a bad teacher from school. Sometimes you learn from it, but often you have to do the heavy lifting for your own personal education.

AHEM… Anyway…

Prompt, Build, Be Annoyed, Research, Do It Myself.

So I went on my prompting journey.

I worked on putting all my ideas into words. Explaining every step in excruciating detail, what every button should do, how it should work, what the structure of the functions should look like.

Again, the issue here is that I don’t know enough about SVGs and their paths, so I am heavily relying on AI to give me a good solution for actually crafting the curves.

I finally get some initial code going but all there was on the page was a svg and a button. Classic AI!

So I had a talk with Claude and gave him some motivation and positive encouragement and finally I got a wave that was starting to look pretty good. The design of the page was completely terrible and dysfunctional, but who needs CSS anyways. 😢

I removed all the CSS and just worked in HTML and JavaScript for the time being.

Finally Some Code to Look At

So after some work with getting the baseline functionality complete, I went to look at the code and was just very lost for a while.

function generatePoints(type, numPoints) {
  const points = [];
  const width = 1440;
  const height = 320;
  const baseY = height * 0.6;
  const maxAmp = height * 0.3;

  switch (type) {
    case "smooth": {
      const controlPoints = [];
      for (let i = 0; i <= numPoints; i++) {
        controlPoints.push(randomInRange(-maxAmp, maxAmp));
      }
      const segments = width / 10;
      for (let i = 0; i <= segments; i++) {
        const x = (i / segments) * width;
        const section = (i / segments) * numPoints;
        const index = Math.floor(section);
        const t = section - index;

        let y;
        if (index >= numPoints) {
          y = controlPoints[numPoints];
        } else {
          const y0 = controlPoints[Math.max(0, index - 1)];
          const y1 = controlPoints[index];
          const y2 = controlPoints[Math.min(numPoints, index + 1)];
          const y3 = controlPoints[Math.min(numPoints, index + 2)];

          const t2 = t * t;
          const t3 = t2 * t;
          y =
            (-0.5 * y0 + 1.5 * y1 - 1.5 * y2 + 0.5 * y3) * t3 +
            (y0 - 2.5 * y1 + 2 * y2 - 0.5 * y3) * t2 +
            (-0.5 * y0 + 0.5 * y2) * t +
            y1;
        }
        points.push([x, baseY + y]);
      }
      break;
    }
  }
  return points;
}

Let’s break this down a little bit. The point generation is a little bit simpler than the path generation. Here’s what the function is doing:

  1. Creates 5 different variables to keep track of positioning and size of the path.
  2. Checks the type of path the user has selected (only ‘smooth’ is displayed in this snippet).
  3. The function then adds the total number of points (set by the user passed via parameter) to an array.
  4. We then break the entire path into ten segments. We do this by taking the full width of the path and dividing by ten.
  5. Each segment constitutes a new X-Value. For each X-Value we are generating a random Y-Value.
  6. We push each coordinate set to our points[] array, and once we have all of our values, we return the generated points.

A Long and Winding Path

Before looking at the code to this next part, let’s talk a little about how paths actually work. Something I didn’t know before this project.

I’m not going into detail about every part of a a path, if you want to understand paths I highly recommend reading the MDN SVG Paths Documentation.

For now, I will only be talking about Bézier Curves. More specifically, the differences between Cubic and Quadratic curves.

Let’s look at some quick differences defined in the documentation.

Bézier Curve Differences
Bézier Type Coordinate System
Cubic
"Cubic Béziers take in two control points for each point. Therefore, to create a cubic Bézier, three sets of coordinates need to be specified."
This means for each point on the SVG path, we actually need a set of three coordinates. For Example,
  <path d="M 0 10 C 30 60, 60 120, 120 10" stroke="black" fill="transparent" />

This path contains:

  • Start Point: (X1, Y1) = “C 30 60”
  • Mid Point: (X2, Y2) = “60 120”
  • End Point: (X, Y) = “120 0”

Quadratic "Requires one control point which determines the slope of the curve at both the start point and the end point. It takes two parameters: the control point and the end point of the curve."
This means for each point on the SVG path, we need to have a set of two coordinates. For Example,
<path d="M 0 10 Q 30 60, 60 60" stroke="black" fill="transparent" />
<path d="M 0 10 Q 30 60, 60 60 T 120 0" stroke="black" fill="transparent" />

This path contains

  • Start Point: (X1, Y1) = "Q 30 60"
  • End Point: (X, Y) = "60 60"

Note: The "T 120 0" coordinate strings together another curve of the same slope at the specified endpoint.

Notes:
  • As you can see the two curves look differently despite using the same start and end points. In the Cubic path the Bézier function "creates a smooth curve that transfers from the slope established at the beginning of the line, to the slope at the other end." Meanwhile, the Quadratic function calculates a symmetrical curve between two points.
  • Coordinates in a SVG path have the same type of grid as a web document. The starting point (written as "M 0 0") is at the top left corner.
  • Please read MDN SVG Paths Documentation for more information on syntax and line drawing commands of the <path> element.
  • Please read Slopes in Mathematics if you do not understand the concept of slopes and graphing.

Now that we understand the basic difference between creating curves with an SVG path and we have a system for generating points within that path, let’s actually generate a path.

More Code

A quick note about how I decided to implement the stroke. I wanted the stroke to only appear on the top edge instead of the whole perimeter so the edges blend seamlessly with other sections, but allow for a harder cutoff between the section you are transitioning to. So you’ll see two paths that are about the same here.

function generatePaths(type, complexity) {
  const points = generatePoints(type, parseInt(complexity));
  let fillPath = `M0,320`;
  let strokePath = `M${points[0][0]},${points[0][1]}`;

  if (type === "smooth") {
    fillPath += ` L${points[0][0]},${points[0][1]}`;
    for (let i = 0; i < points.length - 1; i++) {
      const current = points[i];
      const next = points[i + 1];

      // Calculate control points using tension
      const tension = 0.3; // Adjust this value between 0 and 1 to control curve smoothness

      // First control point
      const cp1x =
        current[0] + (next[0] - points[Math.max(0, i - 1)][0]) * tension;
      const cp1y =
        current[1] + (next[1] - points[Math.max(0, i - 1)][1]) * tension;

      // Second control point
      const cp2x =
        next[0] -
        (points[Math.min(points.length - 1, i + 2)][0] - current[0]) * tension;
      const cp2y =
        next[1] -
        (points[Math.min(points.length - 1, i + 2)][1] - current[1]) * tension;

      // Add cubic Bézier curve command
      const cubicCommand = ` C${cp1x},${cp1y} ${cp2x},${cp2y} ${next[0]},${next[1]}`;
      fillPath += cubicCommand;
      strokePath += cubicCommand;
    }
  } else {
    // For non-smooth types (sharp, jagged, steps)
    fillPath += ` L${points[0][0]},${points[0][1]}`;
    for (let i = 1; i < points.length; i++) {
      fillPath += ` L${points[i][0]},${points[i][1]}`;
      strokePath += ` L${points[i][0]},${points[i][1]}`;
    }
  }

  // Complete the fill path by returning to bottom-right and closing
  fillPath += ` L1440,320 Z`;

  return { fillPath, strokePath };
}

So let’s do another breakdown for this function.

  1. We generate points and start the path at it’s first point.
  2. When we generate a smooth wave we go through all the generated points and create sets of X and Y values.
  3. We create our cubicCommand which takes in the set of X and Y values to determine the slope and the end point value (which is the X and Y of the next point in the list).
  4. Set the path of the stroke and the wave and close the path.

So after getting the most basic wave built, I wanted to add more features so users can create many different variations of a wave and find great ways to transition between sections on a page.

What Did I learn

After reading one page of documentation and becoming an instant genius (yes I did use spell-check on the word genius 😅), I was able to come back to the code, read it, comprehend it and make more decisions of how I wanted to proceed. One major thing I did was switch from a quadratic system to cubic. I wanted the curves to transition and feel more organic rather than stiff and symmetrical. That being said, cubic allows you to get essentially the same curve but with finer controls, so if I’m building a system intended for customization, the more options to work with is something that can come in handy if and when I want to make some crazy shapes with it.

Most importantly I never used AI as a crutch to build this. At most, I used it to research and type my thoughts into code faster, and that’s how I believe people should be using AI.

Confused? That’s why Documentation Exists, not AI.

Knowing how to read and comprehend documentation is what makes a good developer. AI is a great tool for helping you start with your ideas, but if you can’t expand on it, or if you don’t have the foundational knowledge to prompt, you will only get so far with AI.

I remember first starting out with full-stack and reading one page of documentation and being completely overwhelmed by, what at the time seemed to be, super complicated systems. Despite not knowing what I was reading, I still tried to read it.

Read the things you don’t understand, because at some point it will come up in your work and you can say, “Hey, I read about this thing one time somewhere,” and figure out a solution to your problem. Not because you knew how, or because you asked AI, but because you remembered reading that one term somewhere, and that one term is all you needed to piece together a solution.

Goodbye.

Thanks for reading, hopefully you learned something!


Check Out Wave Generator

Wave Generator Github